Transparency note: Some links in this article are affiliate links. If you sign up through them, I may earn a small commission at no extra cost to you. I only recommend tools I actually use and test myself — see how I test.
The first time I learned how to use Midjourney, I needed a single banner image for a blog post. Two and a half hours later I had 47 images, none of them usable, and a Discord chat history full of failed prompts. I was convinced the tool was broken. It wasn’t. I just had no idea how it worked.
Five months and roughly 500 generated images later, I can usually get a publish-ready image in under three minutes. The difference isn’t talent or “prompt engineering wizardry” — it’s nine specific things I figured out the hard way that almost no beginner guide bothers to mention.
This is what I wish someone had told me when I started. If you’re learning how to use Midjourney in 2026, skip the trial-and-error month and start here.
What I Found After 500 Images
- The web app at midjourney.com replaced Discord for me on day one — I haven’t opened Discord for image generation in three months.
- The Basic plan ($10/month, ~200 GPU minutes) covers about 90 images for me — enough for one weekly blog post with iterations.
- Adding a single
--srefcode to my prompt cut my “regenerate again” rate from roughly 6 tries per image to 1.4. - About 30% of the time, I get a better result by starting with an image prompt instead of a text prompt — and almost no beginner guide tells you this.
- The five prompt formulas at the end of this article now produce around 80% of the images I actually publish.
1. You don’t need Discord anymore — the web app is faster
Every “how to use Midjourney” guide I read in early 2026 still walked me through joining a Discord server, finding the #newbies channel, and learning the slash-command syntax. Then I discovered midjourney.com — and never went back.
The web app shows your generations in a clean grid, lets you click an image to upscale or vary it, and remembers every prompt you’ve ever run. Discord forces you to scroll through a chat log to find that prompt you wrote last Tuesday. The web app surfaces it in the search box.
If you already have a Midjourney account, log in at midjourney.com. Your subscription works the same way; the interface is just an order of magnitude better. The only reason I’d touch Discord now is if I’m collaborating in a server with friends.
2. There is no free trial — and the Basic plan is the right starting tier
I wasted my first hour clicking around looking for a free trial button. There isn’t one. Midjourney pulled the free trial in 2023 and hasn’t brought it back. You pay $10/month minimum to generate anything.
Here’s the rough math from my own usage. The Basic plan gives you 200 “GPU minutes” per month. A standard image takes about 1 minute, so that’s roughly 200 generations — but each “generation” actually returns 4 images at once, so you’re getting closer to 800 individual images. In practice, I burn about 90 images worth of GPU time per month producing one blog header per week with iterations.
If you’re testing the tool to see if it fits your workflow, Basic is correct. The $30 Standard plan only makes sense once you’re generating at least 5 polished images a week. The $60 Pro plan is for people doing client work or running a stock-image pipeline. I’ve never needed more than Basic.
3. Short prompts beat long prompts (the opposite of ChatGPT)
I came in with ChatGPT habits: write a paragraph of context, give the model a role, list constraints. That style of prompt is the worst possible thing you can hand Midjourney. It will average all the descriptors together and give you a muddy mess.
My first prompt was something like “Please create an image of a modern minimalist workspace with natural lighting that conveys productivity and focus, suitable for a blog post about getting things done in a calm environment.” It was garbage. Midjourney saw 30+ concept words and gave me a chaotic image.
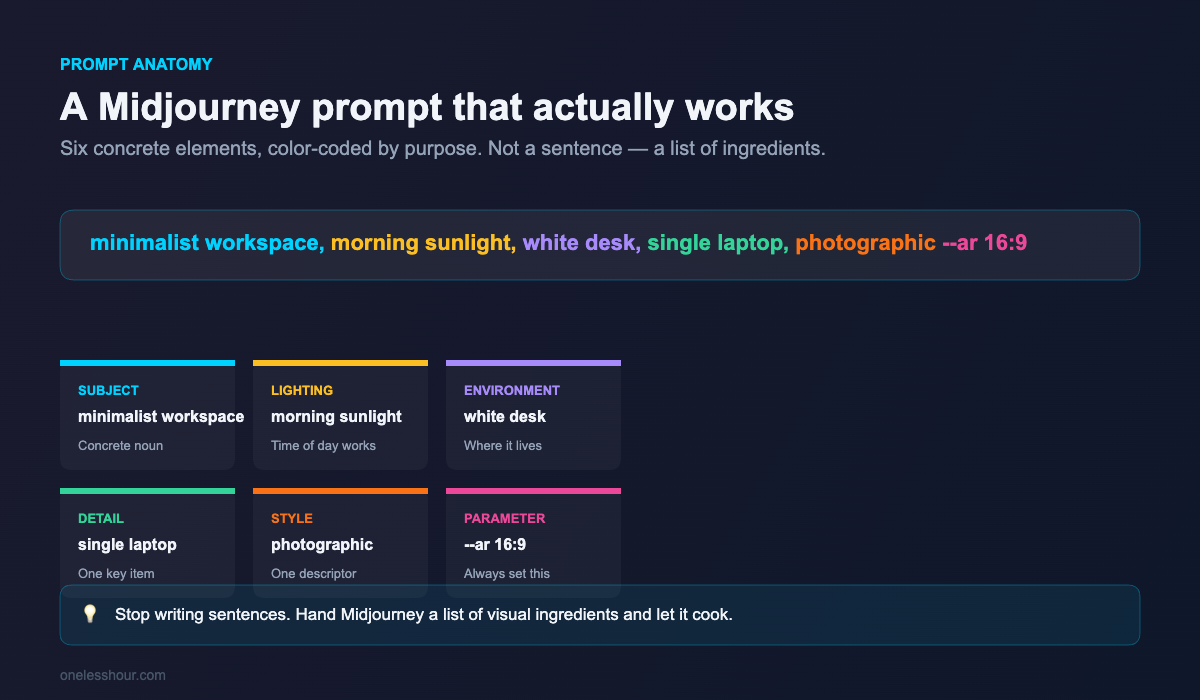
The version that actually worked, after I rewrote it: minimalist workspace, morning sunlight, white desk, single laptop, photographic. Five concrete nouns plus one style word. Done in two tries.
The mental shift: you’re not asking Midjourney to read instructions. You’re handing it a list of visual ingredients and letting it cook.
4. The –sref parameter is the single biggest time-saver
Style References changed how I work. A --sref code is a number that points to a specific aesthetic Midjourney has indexed — film-grain photography, watercolor illustration, retro poster, isometric 3D, whatever. You append it to your prompt, and every image inherits that style.
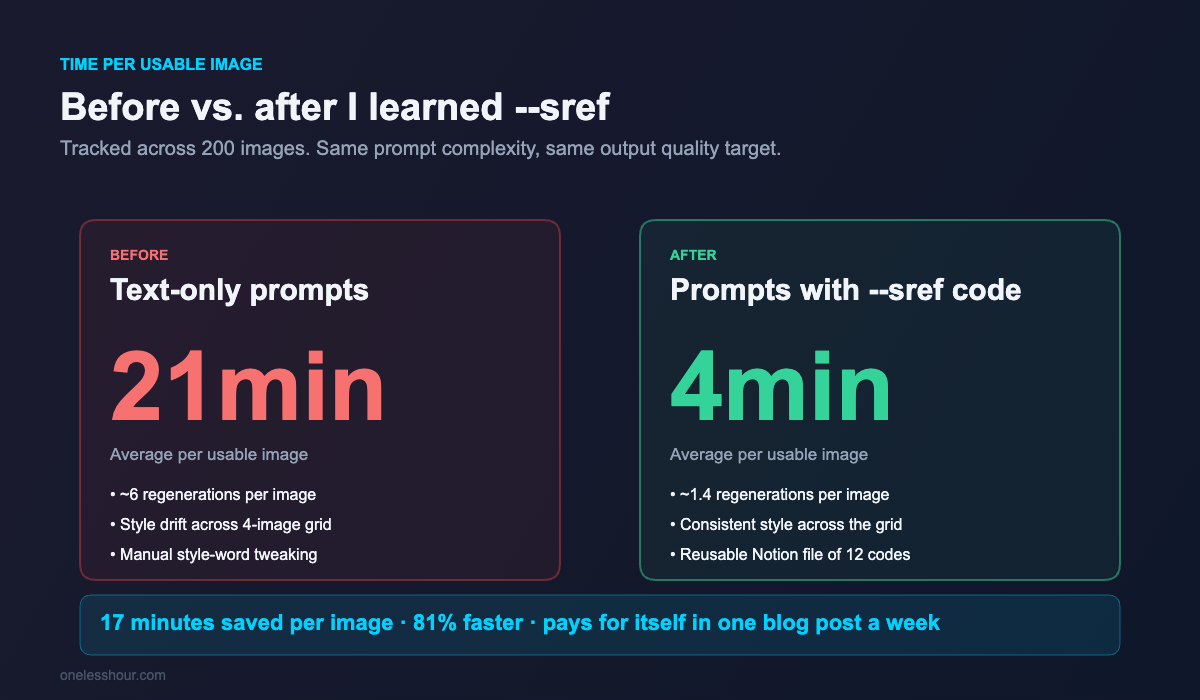
Before I learned about --sref, I’d write a prompt and get four images that looked stylistically unrelated. I’d pick the closest one, regenerate it 4–6 times to nudge the style, and burn 20 minutes. Now I keep a small notes file with maybe 12 --sref codes I’ve found work well, and I just append the right one. My iteration count dropped from ~6 to ~1.4 per usable image.
You can also use a URL of a reference image instead of a code. That’s how I match new images to an existing visual identity — paste the URL of an image I already like, and Midjourney pulls the same color palette and lighting.
5. Set –ar before anything else, every single time
By default Midjourney generates square (1:1) images. Almost nothing on the web is square. Blog headers are 16:9 or 3:2. Pinterest is 2:3. Instagram stories are 9:16. If you forget the aspect ratio parameter, you’re going to crop your image and lose half of what made it work.
I now muscle-memory-type --ar 16:9 into every blog-image prompt. The full pattern looks like this:
[subject], [setting], [style descriptor], [lighting] –ar 16:9 –sref [code]
V8 added 21:9 (ultrawide), 6:11 (vertical reels), and 4:5 (square-ish portraits) as supported ratios. They all work. Use the one that matches where the image will live.
6. Variations vs. Vary (Region) vs. Remix — they each do something different
This confused me for weeks. Midjourney has three different “make this image but a bit different” buttons, and the docs blur them together. Here’s the breakdown after using all three at least 50 times:
| Action | What it actually does | When to use it |
|---|---|---|
| Variations (Subtle) | Keeps the composition. Tweaks details, lighting, expressions. | You like the image but want minor polish. |
| Variations (Strong) | Same prompt, fresh roll. Composition can change a lot. | Image is wrong, prompt is right — just want different attempts. |
| Vary (Region) | Re-rolls only the part you mask. Inpainting. | One element is broken (a weird hand, a wrong color). |
| Remix | Lets you edit the prompt before regenerating. | You want to keep the structure but change the subject. |
“Vary (Region)” is the one I underused for the longest. Half the time I was throwing out a 90%-perfect image because of one bad detail. Now I just mask the bad part and re-roll only that area. It’s a different workflow than I had in my head.
7. Image prompts (image-to-image) are the biggest underused feature
You can paste an image URL into your prompt and Midjourney will use it as the visual starting point. This is different from --sref — --sref copies the style, an image prompt copies the composition and content.
The use case where this saves me the most time: I’ll find a stock photo that has the right composition but wrong subject — say, a person at a desk in a pose I want, but the wrong outfit and lighting. I paste the stock image URL, then add my text describing what I actually want, and Midjourney reinterprets it. The composition holds; the subject changes.
Almost no beginner tutorial covers this. They walk you through text prompts and stop there. About 30% of my final images now start with an image prompt rather than text alone, and they tend to be the ones I’m happiest with.
8. The 5 prompt formulas I now copy-paste from
After 500 images I had patterns. These are the five templates I actually keep in a Notion page and paste from. Replace the bracketed parts and ship.
Blog header (photographic):
[subject], [environment], [time of day], shallow depth of field, photographic –ar 16:9
Blog header (illustrated):
[subject], [environment], flat illustration, [color palette: muted pastels / bold primaries / monochrome], minimal –ar 16:9
Product mockup:
[product name] on [surface], studio lighting, soft shadows, white seamless background, product photography –ar 4:5
Concept illustration:
[abstract concept] visualized as [metaphor object], geometric shapes, gradient background, editorial illustration –ar 3:2
Character (consistent style):
[character description], [outfit], [setting], [emotion/expression], cinematic lighting –ar 2:3 –sref [your code]
Notice how short they are. Six to eight concrete elements, never sentences. Once you’ve used a formula twice, the third image takes 30 seconds to write.
9. When NOT to use Midjourney (and what I use instead)
This is the section nobody writes. Midjourney is great. It’s also wrong for several jobs I used to default to it for:
Anything with text in the image. Midjourney still mangles text. If you need a poster with a real headline, generate the image without the text and add the typography in Canva or Figma. Don’t fight it.
Editing an existing photo. You can use image prompts, but for genuine photo editing — removing a background, fixing the sky, retouching a face — Photoshop or even the free background removers do better. Midjourney reinterprets; it doesn’t surgically edit.
Quick free images for low-stakes uses. If I just need a stock-photo-grade image for a blog post that won’t be a centerpiece, I’ll often hit a free generator first — see my roundup of the best AI image generators for cheaper options that get you most of the way there.
Generating 50 variations of the same thing. When I need to A/B-test a hero image and I want quantity, I’ll use a tool with bulk-generation built in. Midjourney’s per-image quality is better, but it’s not built for volume.
The mistakes I made (so you don’t have to)
Five months in, here are the four mistakes that cost me the most time and GPU minutes.
I tried to fix bad images with longer prompts. If the first generation is fundamentally wrong, adding more words to the prompt almost never saves it. Cut the prompt down, change the style word, or use an image prompt. Stop typing.
I generated everything at default quality. The --q 2 flag (high quality) burns more GPU minutes but produces noticeably sharper images. I should have used it on final images from day one. I now use it on the last regeneration after I’ve nailed the prompt.
I didn’t save my favorite –sref codes anywhere. I’d find a perfect style, use it once, and lose it forever. I now keep a Notion page with maybe 15 codes labeled by what they’re good for (“editorial photography, muted greens” / “retro 80s poster” / “isometric tech illustration”).
I forgot the aspect ratio at least 100 times. Crop-after is fine sometimes. But for tall images especially, the composition was built for square — cropping it loses the framing. Set --ar first.
Frequently Asked Questions
Is Midjourney free?
No. Midjourney removed its free trial in 2023 and hasn’t brought it back. The cheapest paid plan is the Basic at $10/month, which covers roughly 200 generations (about 800 individual images). If you want a free option, several alternatives exist — see my best AI image generators roundup for the strongest free tiers.
Do I still need Discord to use Midjourney?
No. The web app at midjourney.com is the primary interface as of 2024 and only got better in 2025–2026. It’s faster, has a real prompt history, and supports the editor for inpainting. I haven’t opened Discord for Midjourney in months.
What’s new in Midjourney V8?
V8 launched in alpha in March 2026. The headline features are native 2K-resolution generation, dramatically improved prompt comprehension (it follows complex prompts more literally), and faster, cheaper Style References. It also added new aspect ratios including 21:9 and 6:11. You can switch versions in your account settings.
Can I use Midjourney images commercially?
Yes, on any paid plan. Midjourney grants you ownership of images you generate as long as you have an active subscription. If you generate something on the Basic plan and later cancel, you keep the rights to images already generated. Read the current Terms of Service for the exact wording — they update it occasionally.
How long does it take to learn Midjourney?
You can produce a usable image on day one if you keep prompts short and use a --sref code. Getting consistent, on-brand results across many images took me about three weeks of regular use. The five prompt formulas above cut that learning curve substantially — I wish I’d had them on day one.
What’s the best Midjourney alternative?
It depends on what you need. For free images, Bing Image Creator (DALL-E 3) is the strongest free option. For text-in-image work, Ideogram beats Midjourney decisively. For photo-realistic faces and editing, Adobe Firefly is more reliable. I broke down the strongest options in my 7 Best AI Image Generators roundup.
Where to start tonight
If I were starting fresh today, here’s what I’d do in the first hour. Sign up for the Basic plan ($10/month). Open midjourney.com, ignore Discord. Pick one of the five formulas above and replace the bracketed parts with whatever you actually need an image for. Add --ar 16:9. Generate. Use Variations (Subtle) once. Done.
That single workflow would have saved me my entire first week. Once you’ve made 10–15 images that way, the rest of the features start making sense in context — the variations, the inpainting, the image prompts. Don’t try to learn everything before generating; the tool teaches you faster than any tutorial can.
If you’re stitching Midjourney into a broader AI workflow, you might also like my breakdown of the AI productivity stack I use every day, or the 8 best AI tools for content creation if Midjourney is one piece of a bigger publishing pipeline.